What is Keycard?
If you're not already familiar with Keycard – Keycard is an open-source hardware wallet for managing private keys and signing transactions. It takes the form of a credit card and uses NFC technology for a contactless experience with the Status mobile app. Keycard combines the convenience of a contactless credit card, with the security of a hardware wallet.
It was first introduced as Status Hardwallet at Devcon3, back in November 2017. It was then relaunched as an initial version of Keycard in February 2019, and made available only as a beta technology. Beta versions of the Smartcard and Keycard SDK were soft-launched; targeted towards developers both to hack on, and to build wallet integrations with. Keycard is now in for a full product launch in June 2020.
The initial primary use for Keycard is with the Status mobile app. However; the open design encourages developers and DApp partners to leverage both the software and hardware capabilities of Keycard, to build out their unique innovations in the crypto space!
If you are already familiar with Keycard – to coincide with the June 2020 full product launch; in this article I'm going to cover the various details surrounding both the upgrading and updating of Keycard, from old to new, and the big differences between the two. You can read about the launch here.
There are a few details to be covered in this article, so let's dive on in!
So, what if you own an old Keycard?
There is good news! IF you own one of our previous Keycards; by following the software upgrade I will detail below, you can use it just the same as our new cards.
Our old cards run on the JCOP3, and our new cards on the JCOP4 hardware. Happily, both of these platforms can run the same software, meaning that if you do happen to own one of our old cards, you will still be able to utilise all of our new functionality. But if you do want to use our new Cash Applet software, or any feature of Keycard v3+, you should upgrade your card as below.
While we're talking about older versions; existing Status users, who already have an older version of the Status mobile app installed, will have to uninstall the app and reinstall the latest version to start using the app with Keycard.
What are the technical differences?
The differences between an old Keycard running software version 2.1.1, and a new Keycard running software version 3.0.2+ are:
- Additional options added to the
SIGNcommand to facilitate usage in POS transactions. - Both the
STORE DATAandGET DATAcommands have been added. - The
SET NDEFcommand has been removed, replaced by the aboveSTORE DATAcommand. - The
DUPLICATE KEYcommand has also been removed.
Two of the latest big changes, between the old and new Keycards; are the compatibility with production-ready JCOP4 platform hardware, and the reduced number of NVM writes, for improved performance.
Alongside the above; the biggest difference is the addition of the new Cash Applet software.
Practically, what does that mean?
The biggest JCOP4 improvement is that it is much faster than the previous JCOP3. Typically, when using Keycard with JCOP3 platform hardware, logging in to your Status account took 8-10 seconds. With JCOP4, this time is drastically reduced to just 2-3 seconds – a huge improvement!
The new Cash Applet can be used to integrate Keycard with DApps, using the Keycard Web3 Javascript API. See documentation and example here.
The Keycard wallet behaves like a regular hardware wallet and thus DApps can use it transparently, as any other account. The Cash applet however, not being associated to a wallet and not being suitable to sign transactions (since it does not hold funds), must be specifically supported by dApps utilising it, usually to sign EIP-712 formatted meta-tx (Meta Transactions).
For this reason, we have defined some extensions to the Web3 API. At the moment, these are supported by the Status app. The specifications you can find here are for both DApp developers wanting to support Keycard Cash in their DApp, as well as wallet app developers wanting to implement the aforementioned extensions.
Installing the new Applet Software
🔥 Warning
Please only use the following instructions on a development card, on which you don’t have a live key that you use for your funds. We are going to delete the old card keys and start from scratch, so if you don’t have a backup, it won’t be possible to recover the master key.
If you have already received a new Keycard, you can skip the below, as the new applet is already installed. However, you can otherwise follow these instructions to upgrade to a new applet version.
🚨 Remember that re-installing the applet means losing the master key and starting from scratch.
The following instructions will assume a Mac or Linux machine.
Requirements:
- The keycard CLI
- A keycard
- A USB Smartcard reader
Install / Upgrade instructions:
Before we begin – plug in your usb Smartcard reader, and insert/place your Keycard.
- Firstly; download the keycard-cli from https://github.com/status-im/keycard-cli/releases and rename the binary executable to
keycard(keycard.exeif you are on Windows). - Secondly; Download the latest Keycard cap file from https://github.com/status-im/status-keycard/releasesand rename it to
keycard.cap - Next, download this Gist file as
install_keycard.sh - Now, place all of the above 3 files in the same directory for simplicity.
- Finally, in a terminal window; cd to that directory and run:
./keycard shell < install_keycard.shIf successful, you will see the following:

Alternatively, you can run the simpler install command:
./keycard install -a path/to/keycard.capApplet Initialisation
Note:- The steps below aren't strictly necessary for the upgrade process, and can be done through the new Status app. However, as developers, hopefully like me it's more fun doing them manually!
This initialisation process itself is necessary to bring forth the initial credentials to your Keycard instance. When the card is not initialised, it cannot perform any operations.
Initialisation also sets the initial PIN, PUK, and pairing password – and although it requires no authentication, it still uses a SecureChannel resistant to passive MITM attacks.
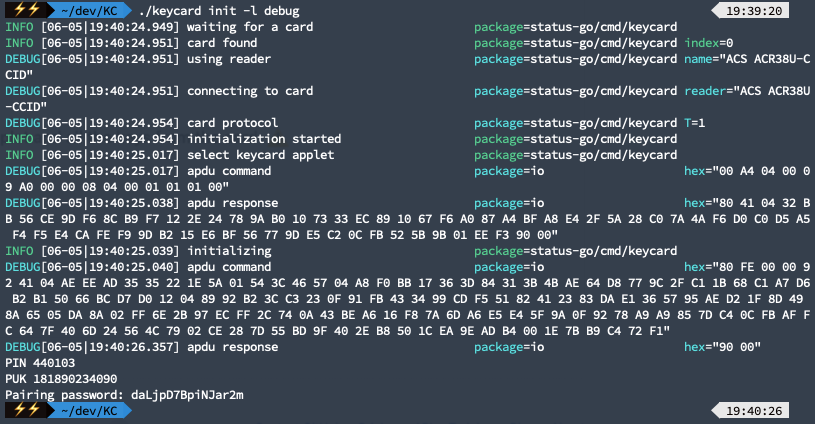
To initialise your Keycard, simply run the following command from your chosen directory:
./keycard init -l debugUpon success, you will see the following:
Alternatively, you can use the following Keycard shell command to personalise the set secrets:
./keycard shell <<END
  keycard-select
  keycard-set-secrets 123456 123456789012 KeycardTest
  keycard-init
END
You should never share your PIN, PUK or Pairing password – however; the above is from a test card, not linked to my actual wallets, so in this case it's alright.
Generating the Keycard master key
Now that the newest applet is installed/upgraded and initialised; we can start using our wallet. The next thing to do is to generate the master key:
Signing a message with Keycard
Finally, we can use the HD wallet we created to sign a message, with a key derived from any derivation path:
The output will show the signature, and will automatically derive its public key and address.
Conclusion
To wrap up this first of my Keycard technical tutorials, I'd like to offer a HUGE commendation and congratulations to the Keycard Team, for building a truly great and impressive product!
To summarise the technical points of this article; as it turns out – the new Keycard (although offering much upgraded software), can be used exactly as the old Keycard with just a simple upgrade procedure.
The upgraded software offers great performance improvements, and the new Cash Applet opens up Keycard to a whole world of DApp adventures.
If you have any questions about Keycard, feel free to email us at support@status.im or better yet, join our Keycard chat.
Otherwise, if you would like to reach out to me personally, you can do so here!
It is both my hope, and sincere opinion, that Keycard will become the open framework for Smartcards in the Cryptosphere.
I really can't wait to see what you build with Keycard!