What is Keycard?
If you're not already familiar with Keycard – Keycard is an open-source hardware wallet for managing private keys and signing transactions. It takes the form of a credit card and uses NFC technology for a contactless experience with the Status mobile app. Keycard combines the convenience of a contactless credit card, with the security of a hardware wallet.
It was first introduced as Status Hardwallet at Devcon3, back in November 2017. It was then relaunched as an initial version of Keycard in February 2019, and made available only as a beta technology. Beta versions of the Smartcard and Keycard SDK were soft-launched; targeted towards developers both to hack on, and to build wallet integrations with. Keycard is now in for a full product launch in June 2020.
The initial primary use for Keycard is with the Status mobile app. However; the open design encourages developers and DApp partners to leverage both the software and hardware capabilities of Keycard, to build out their unique innovations in the crypto space!
If you are already familiar with Keycard – to coincide with the June 2020 full product launch; I'm producing a series of product tutorials, the first of which can be found here covering the updating & upgrading from old to new Keycards.
In this tutorial, we're going to explore the Keycard CLI & Keycard Shell software, and how to use them to build out your own Keycard integrations.
There are a few details to be covered in this article, so let's dive on in!
Keycard & Card Reader
Something I did not cover in my last tutorial is the card reader to be used alongside Keycard. When you purchase a Keycard, it should be noted that a Smartcard reader, USB or otherwise, is not included in the purchase.
Happily; Smartcard readers are inexpensive, and readily available for purchase.
Personally, I use an ACS Pocketmate. I don't actually have any specific reasons for using this model, and there are many similar available, but as it is small and inexpensive – it is ideal. I think it's better to have a card reader with physical contacts, as opposed to NFC, as they are generally more reliable.
Communication with Keycard happens through an APDU interface, alongside a Secure Channel – guaranteeing confidentiality, authentication, and integrity of all commands. It supports both NFC and ISO7816 physical interfaces, meaning that it is compatible with any Android phone equipped with NFC, and all USB Smartcard readers.
The most apparent usecases for Keycard integrations are Crypto wallets, however it can be used in any other systems utilising a BIP-32 key tree, or in which authentication & identification are performed.
Keycard-CLI & Keycard Shell
Keycard CLI is built atop of the Keycard-Go library.
Keycard shell, in essence, is a 1:1 interface to every command available in Keycard's repertoire. It is a non-interactive shell and we have to pipe commands directly to the keycard executable, as I will demo below.
Available Commands:
As the Shell can utilise every Keycard command, there are far too many for me to cover just in this tutorial, but I will demonstrate some of the main & most common. The selection of commands below, alongside the Keycard docs will ensure you can step away from this with a definite understanding of the Keycard Shell and its commands.
Re-installing the Keycard Applet
In my previous tutorial; I covered installing the Keycard applet software. There may come a time when you need to re-install the Applet software, and you can do so by running the install command, and appending the -f flag to force the re-install.
./keycard install -l debug -a path/to/keycard.cap -fRunning the above install CLI command, is equivalent to piping the install_keycard.sh bash script to the Keycard Shell.
Shell Commands Breakdown:
The commands called in the install script are:
The gp prefix on each of these commands stands for Global Platform, and is a wrapper around the low-level APDU commands.
Firstly, select is called which is used to pick the application on the card, making it the active choice. Modern SmartCards can have several applications installed, so after connection with the card is made, we need to select the Keycard applet.
The open-secure-channel command is then called as the first step to establish a Secure Channel session. After a successful OPEN SECURE CHANNEL command; all communications between card and client are encrypted.
delete is called to ensure existing keys & applications are cleared enabling a fresh install. Once a fresh environment is ensured, the load command is called, alongside a route to the desired cap file, to load the Keycard package onto the card.
Finally, the install-for-install command is called, for each, the NDEF, Keycard & Cash Applets.
Check current Keycard Status
By running the above commands through the Keycard Shell, you should see a result similar to the below – detailing attributes such as the key initialisation status, the key path, and the PIN & PUK retry counts:
STATUS - PIN RETRY COUNT: 3
STATUS - PUK RETRY COUNT: 5
STATUS - KEY INITIALIZED: true
STATUS - KEY PATH: m/44'/60'/0'/0/0

UNPAIRED
Shell Commands Breakdown:
keycard-select is called to select & make active the Keycard Applet. The set-secrets command is then called, with a chosen PIN, PUK & Pairing Password for authentication. Your chosen authentication phrases should be kept safe, as you'll be asked for them when pairing with your Keycard for all future transactions.
With the above authentication options, the pair command is sent to couple the Keycard and client. The open-secure-channel command is called to establish a Secure Channel session.
Now the secure connection is established, get-status can be called to return the Keycard information detailed in the example above.
The unpair command is sent to unpair a client. An existing secure channel session must be open – hence the verify-pin command being called before the session can be closed.
Generating the Master Key
We can pipe the generate-key command into the Keycard Shell, which generates and stores keys completely on the card. The resulting state of the Keycard after execution, is the same as if we performed a LOAD KEY command.
To run the key generation command, a secure channel must be open, and the user PIN must be verified.
Shell Commands Breakdown:
The commands issued to Keycard Shell, in this instance, are very nearly the same as the commands run in the above example (getting the Keycard status).
The big difference here; is the verify-pin command being called before we call the generate-key command, and not immediately before the unpairing as above.
Using the Generate Key function to generate keys on-card is the simplest and safest key creation method; as the generated wallet never leaves the Keycard and there is no “paper backup” to keep secure.
Derive Key and Signing
Signing is the primary goal of Keycard, and indeed, most hardware wallets. Keycard performs signing with the currently active key. Key derivation is used to select the active key to a specific key BIP32 key path.
As mentioned before, the Keycard is a BIP32 compatible wallet. This means that it can perform key derivation as defined by the BIP32 specification in order to create a hierarchical deterministic wallet. When deriving a key, this key becomes active. The active key is persisted across sessions, meaning that a power loss or Applet re-selection does not reset it.
When creating or importing a wallet to the Keycard, the active key is the master key. Unless you imported a non-BIP32 compatible wallet, you usually want to set the active key to a currency account by following the BIP44 specifications for paths. Note that the maximum depth of the key path is 10, excluding the master key.
Shell Commands Breakdown:
In a manner exactly as above, when the Derive Key script is run; the Keycard application is selected and activated, the session is paired & a secure channel opened, and the session pin is verified.
The underlying DERIVE KEY command is used before a signing session, to generate a private key according to BIP32 specs.
In the example above, I've used the standard key path m/44'/60'/0'/0/0, before calling the sign command with 32 bytes of data.
And I got the following results:

Removing the Master Key
Running the REMOVE KEY command; deletes the key from the card, bringing it back to an uninitialised state. No signing operation is possible after this command, until a new LOAD KEY command is performed.
Shell Commands Breakdown:
The key removal bash script example is identical to the Key generation example, and therefore self explanatory. The only difference being the remove-key command being issued, which calls the KeycardRemoveKey function in the underlying Go SDK.
Signing with the Cash Applet
The final piece of functionality I'm going to cover in this tutorial, is the ability to sign transactions with the Keycard Cash Applet.
When installed, the new Cash Applet immediately generates a Keypair which cannot be changed, exported or used for derivation. The applet only responds to the SELECT and SIGN commands, and has no concept of PIN or SecureChannel.
The use cases for this applet are burner wallets, payment cards (including prepaid ones). This applet can be installed alongside the main Keycard applet and does not interfere with it.
As the name implies, the applet has roughly the same security level of cash in the pocket and should be used with this in mind. Security can be enhanced by making the Applet a signer to a SmartContract (instead of holding funds directly), and applying anti-fraud policies on the network.
The SDK provides a separate command set to interact with this Applet.
Shell Commands Breakdown:
This script is particularly short!
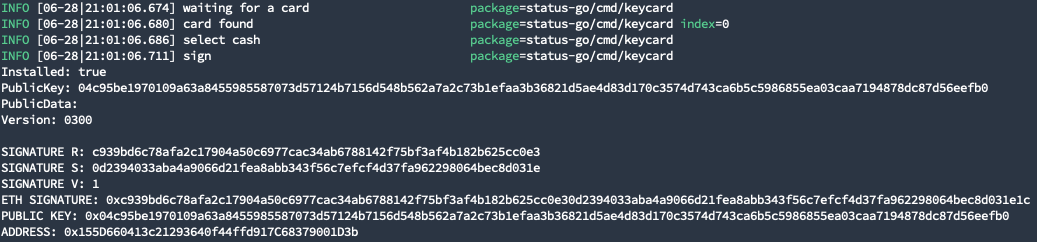
The underlying Cash Select function is called with cash-select, and the underlying Cash Sign function is called with cash-sign.
The result I got when running the script was:
Conclusion
To wrap up this second of my Keycard technical tutorials; I would once again like to offer a HUGE commendation and congratulations to the Keycard Team, for building a truly great and impressive product!
To summarise the technical points of this article; the Keycard Shell is a high-level wrapper around the low-level Keycard SDKs, and can access all commands in Keycard's toy box!
If you are simply looking to utilise your Keycard without any code, you can achieve this by setting up the card with the new (1.4+) Status App, and you can entirely bypass the CLI & Shell.
In my next tutorials, I will be covering real-world Keycard code integrations – including building mobile apps, and building with the Golang SDK.
If you have any questions about the Keycard CLI, Shell or SDKs; feel free to email us at support@status.im or better yet, join our Keycard chat.
Otherwise, if you would like to reach out to me personally, you can do so here!
I really can't wait to see what you build with Keycard!